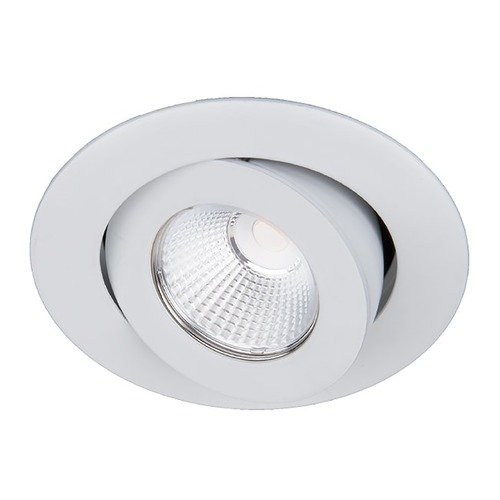
That tiny kitchen. That cramped hallway. Those awkward nooks. Sometimes, the best lighting solution comes in a small package, and that’s where the 3 recessed can light shines. They offer focused illumination without dominating your ceiling space, making them a go-to for targeted lighting and smaller areas. But before you start cutting holes, you need to understand your options and choose the right can for the job.
At a glance:
- Size Matters: 3″ cans are ideal for small spaces, task lighting, and accent lighting. Larger cans (4″, 5″, 6″) are better for general illumination in larger rooms.
- LED is King: For energy efficiency, lifespan, and dimming capabilities, LED is generally the best choice.
- Trim Types Affect Style: Baffle, reflector, gimbal – the trim significantly impacts the light’s appearance and function.
- Consider Housing Type: New construction housings differ from remodel (or “retrofit”) housings.
- Think About Color Temperature: Warmer light (2700K-3000K) creates a cozy ambiance, while cooler light (3500K-4000K) is better for task lighting.
Why Choose 3″ Recessed Lighting?
Three-inch recessed lights offer several advantages, especially in particular situations. Their compact size makes them ideal for:
- Tight Spaces: Think hallways, closets, under-cabinet lighting, and small bathrooms.
- Accent Lighting: Highlighting artwork, bookshelves, or architectural details.
- Task Lighting: Providing focused light over countertops, desks, or reading nooks.
- Low Ceilings: Minimizing the visual impact of lighting fixtures.
They offer a more subtle and less intrusive lighting solution compared to larger can lights.
Understanding the Anatomy of a 3″ Recessed Light
A recessed can light isn’t just a bulb stuck in the ceiling. It’s a system composed of several parts:
- Housing: This is the metal can that’s installed inside the ceiling. It holds the wiring and the light fixture. Housings come in two main types:
- New Construction: Nailed or screwed to joists before the ceiling is installed.
- Remodel (Retrofit): Designed to be installed after the ceiling is in place using clips or tension springs.
- Trim: This is the visible part of the light that you see from below. It’s the decorative element that surrounds the light bulb or LED module. Trims come in various styles, finishes, and functions (more on this later).
- Light Source: This is the bulb or LED module that produces the light. LED is the most common and energy-efficient option these days.
Choosing the Right Housing: New Construction vs. Remodel
The first big decision is choosing the right housing. The type of housing you need depends entirely on whether you’re installing the lights in a new construction project or retrofitting them into an existing ceiling.
- New Construction Housings: These are designed to be installed before the ceiling drywall is up. They typically have mounting brackets that attach directly to ceiling joists. They’re generally more robust and can handle heavier fixtures.
- Remodel (Retrofit) Housings: These are designed for existing ceilings. They feature spring clips or tension arms that secure the housing to the drywall. Retrofit housings are easier to install in existing spaces because you don’t need access to the joists.
Pitfall to Avoid: Don’t try to use a new construction housing in an existing ceiling or vice versa. It will be a headache, and you could damage your ceiling.
Exploring Trim Options: Style and Function
The trim is what you see. It significantly affects the light’s appearance and how the light is distributed. Here’s a breakdown of common trim types:
- Baffle Trim: Features a series of concentric rings that help reduce glare. Excellent for general lighting and creating a softer, more diffused light.
- Reflector Trim: A smooth, highly reflective surface that maximizes light output. Ideal for task lighting where you need a brighter, more focused beam.
- Gimbal Trim: Allows you to adjust the direction of the light beam. Perfect for accent lighting and highlighting specific objects.
- Eyeball Trim: Similar to gimbal trim, but with a more discreet, “eyeball” appearance.
- Wall Wash Trim: Designed to cast light evenly down a wall, highlighting texture and architectural features.
- Decorative Trim: Comes in various styles and materials to match your décor. Can include glass, metal, or other decorative elements.
Choosing the right trim involves balancing aesthetics and functionality. Do you prioritize reducing glare, maximizing light output, or directing the light beam? Let that guide your choice.
LED or Incandescent? The Light Source Showdown
While incandescent bulbs might seem like the cheaper upfront option, they’re rapidly becoming obsolete for good reason. LED (Light Emitting Diode) technology offers significant advantages:
- Energy Efficiency: LEDs consume significantly less energy than incandescent bulbs, saving you money on your electricity bill.
- Lifespan: LEDs last much longer than incandescent bulbs, reducing the need for frequent replacements.
- Dimming Capabilities: Most LEDs are dimmable, giving you greater control over the light level.
- Heat Output: LEDs produce very little heat, making them safer and more comfortable to use.
While the initial cost of LED lights is higher, the long-term savings and performance benefits make them the clear winner.
Decoding Color Temperature: Setting the Mood
Color temperature, measured in Kelvin (K), describes the “warmth” or “coolness” of the light. This is a crucial decision, as it heavily influences the mood and atmosphere of your space.
- Warm White (2700K-3000K): Creates a cozy, inviting ambiance. Ideal for bedrooms, living rooms, and dining rooms.
- Soft White (3000K): A good balance between warm and cool. Suitable for a variety of spaces.
- Cool White (3500K-4100K): A brighter, more energizing light. Best for kitchens, bathrooms, and workspaces.
- Daylight (5000K-6500K): Mimics natural daylight. Ideal for task lighting and areas where accurate color rendering is important.
Think about the primary function of the room and the desired ambiance. A warm color temperature creates a relaxing environment, while a cooler temperature promotes alertness and focus.
Installation Considerations: DIY or Hire a Pro?
Installing 3″ recessed lighting can be a DIY project for experienced homeowners, but it’s essential to understand the electrical safety implications. Working with electrical wiring can be dangerous if you’re not careful.
When to DIY:
- You’re comfortable working with electrical wiring and have experience with similar projects.
- You have a good understanding of electrical codes and safety procedures.
- You’re installing retrofit housings in an existing ceiling.
When to Hire a Pro: - You’re uncomfortable working with electrical wiring.
- You’re installing new construction housings.
- You need to run new wiring.
- You’re unsure about any aspect of the installation process.
Important Safety Tip: Always turn off the power at the circuit breaker before working on any electrical wiring.
Planning Your Lighting Layout: Getting the Spacing Right
Proper spacing is crucial for achieving even and balanced illumination. There’s no one-size-fits-all answer, but here are some general guidelines:
- Spacing: As a rule of thumb, space your 3″ recessed lights about 2-3 feet apart. This will ensure adequate light coverage without creating hot spots or shadows.
- Distance from Walls: Position the lights about 1.5-2 feet from the walls. This helps to create a more even wash of light and prevent dark corners.
- Consider Room Size: In larger rooms, you may need to increase the spacing between lights.
- Adjust for Trim Type: Reflector trims can be spaced slightly further apart than baffle trims.
Example: For a small hallway that is 3 feet wide, you could place a row of 3″ recessed lights down the center, spaced about 2.5 feet apart.
Addressing Common Misconceptions About Recessed Lighting
- Misconception: Recessed lighting is only for modern homes.
- Reality: Recessed lighting can complement a variety of architectural styles, from traditional to contemporary. It’s all about choosing the right trim and color temperature.
- Misconception: Recessed lighting is difficult to install.
- Reality: Retrofit housings are relatively easy to install in existing ceilings. New construction housings require more planning and effort.
Smart Lighting Integration: Adding Convenience and Control
Consider integrating your 3″ recessed lights with a smart lighting system. This allows you to control the lights remotely, set schedules, and even dim them with your voice.
Smart lighting systems offer several benefits:
- Convenience: Control your lights from anywhere using your smartphone or tablet.
- Energy Savings: Dim the lights or turn them off automatically when you’re not using them.
- Security: Create the illusion that you’re home when you’re away by setting schedules.
- Ambiance: Adjust the light level and color temperature to create the perfect mood for any occasion.
Budgeting for 3″ Recessed Lighting: What to Expect
The cost of 3″ recessed lighting can vary depending on several factors:
- Housing Type: New construction housings are generally more expensive than retrofit housings.
- Trim Type: Decorative trims can be more expensive than basic trims.
- Light Source: LED lights are more expensive upfront than incandescent bulbs.
- Installation Costs: Hiring a professional electrician will add to the overall cost.
As a rough estimate, expect to pay between $25 and $75 per light, including the housing, trim, and bulb. Professional installation can add another $50 to $100 per light.
Troubleshooting Common Problems: A Quick Guide
Even with careful planning, you might encounter some common problems:
- Lights Flicker: This could be due to a loose connection, a faulty dimmer switch, or incompatible LED bulbs.
- Lights Don’t Dim Properly: Make sure you’re using dimmable LED bulbs and a compatible dimmer switch.
- Lights Buzz: This can be caused by a faulty dimmer switch or incompatible LED bulbs.
Next Steps: Planning Your Project
Now that you have a solid understanding of 3″ recessed lighting, it’s time to start planning your project.
- Assess Your Needs: Determine the areas where you need additional lighting and the type of lighting you want to achieve (general, task, accent).
- Choose Your Housing Type: Decide whether you need new construction or remodel housings.
- Select Your Trims: Consider the style of your room and the functionality you need.
- Choose Your Light Source: Opt for LED lights for energy efficiency and longevity.
- Plan Your Layout: Determine the optimal spacing and placement of the lights.
- Consider Smart Lighting Integration: Decide if you want to integrate your lights with a smart lighting system.
Many homeowners find that upgrading their can lights can make a huge difference in a room. If you’re thinking about a larger project, you might want to Upgrade Your Can Lighting throughout your home.
With careful planning and the right choices, you can transform your space with the subtle yet effective illumination of 3″ recessed lighting.

- DIY Bathroom Mirror Frame Designs on a Budget - October 12, 2026
- Creative Bathroom Mirror Border Ideas for Every Style and Budget - October 11, 2026
- Bathroom Finishes That Handle Moisture and Look Great - October 10, 2026










