Looking to maximize the space in your shed? With the expert tips from an experienced carpenter, you can transform your ordinary shed into a functional and versatile work area or storage space. In this article, we will dive into the process of building a mezzanine floor in your shed, providing you with all the necessary guidance and insights to create a seamless and efficient expansion. From measuring and planning to assembling and securing each component, our carpenter’s expertise will ensure top-notch craftsmanship and utmost safety. So, let’s get started and unlock the full potential of your shed with a mezzanine floor!
Key Takeaways:

- Determine the desired size and location of the mezzanine floor, including posts, stairs, and overall footprint.
- Consider the required clearance height, taking into account factors like forklift access.
- Cut and prepare rim joist and floor joist boards from 2×6 treated lumber.
- Set the rim joists on the shed foundation and attach outer floor joists to the rim boards.
- Install joist hangers onto the rim joists and continue installing the rest of the floor joists.
- Ensure the floor framing is square for stability and structural integrity.
- Use 3/4 inch plywood as the surface for the mezzanine floor.
- It is highly recommended to have the mezzanine floor engineered to ensure it meets safety standards and is fit for its intended purpose.
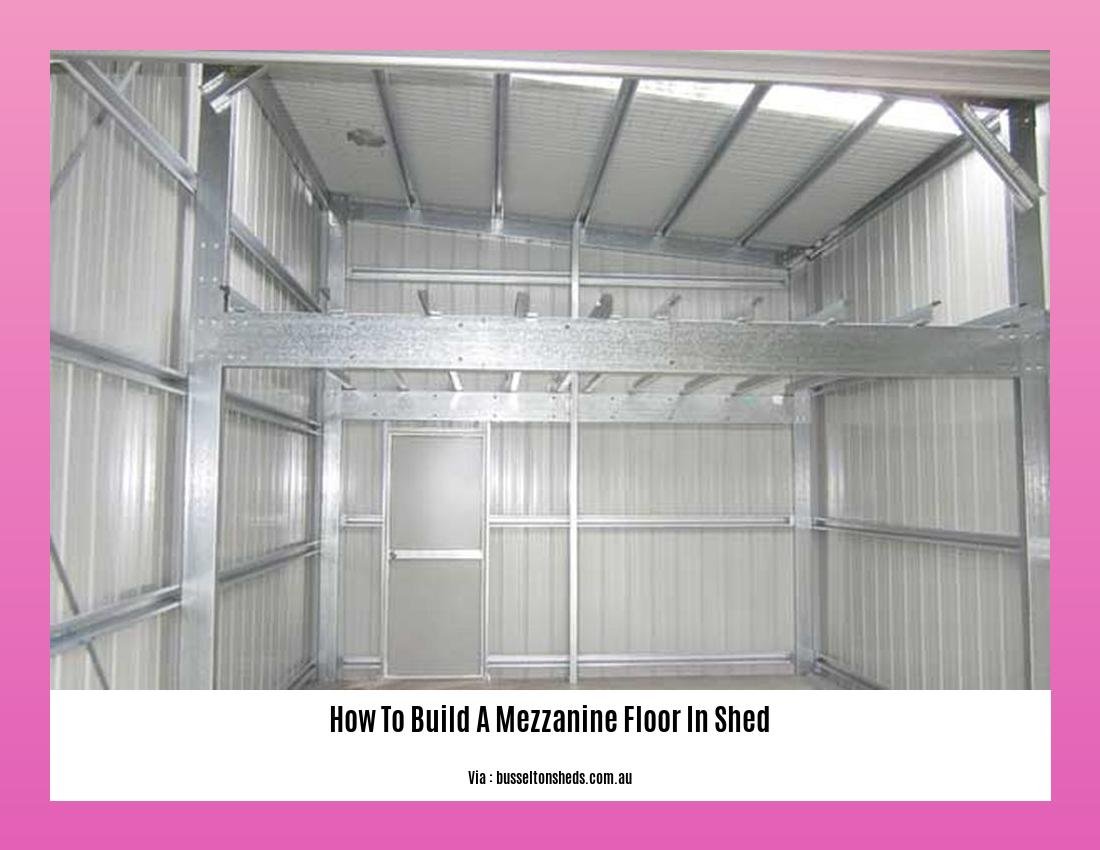
How to Build a Mezzanine Floor in Your Shed
If you’re looking to maximize the space in your shed and create a versatile work area or extra storage space, building a mezzanine floor is a perfect solution. As an experienced carpenter specializing in shed renovations, I have the expertise to guide you through the process step by step. In this instructional guide, I will walk you through the process of constructing a mezzanine floor in your shed using expert tips and tricks.
Step 1: Determine the Size and Layout
The first step in building a mezzanine floor is to determine the overall size and layout. Measure the width and length of your shed, and mark out the location of the posts, stairs, and overall footprint on the surface. This will help you visualize the space and plan accordingly.
Step 2: Consider Clearance Height
Next, consider the clearance height required for your mezzanine floor. Take into account factors such as forklift access and any other equipment that may need to pass beneath the floor. It’s crucial to ensure there is sufficient clearance to avoid any obstacles and maximize the functionality of your mezzanine.
Step 3: Prepare the Materials
Now it’s time to gather the materials you’ll need for the construction. You’ll need 2×6 treated lumber for the rim joists and floor joists, as well as joist hangers and 3/4 inch plywood for the floor surface. Make sure to measure and cut the boards to the appropriate lengths.
Step 4: Set the Rim Joists
Begin by setting the rim joists on the shed foundation. These joists will serve as the outer perimeter of the mezzanine floor. Use nails or screws to secure them in place, ensuring they are level and flush with the shed walls. This will provide a solid foundation for the rest of the floor framing.
Step 5: Install the Floor Joists
Next, nail the outer floor joists to the rim boards. These joists will provide additional support and stability for the mezzanine floor. Make sure they are evenly spaced and securely attached to the rim joists. Once the outer floor joists are in place, you can proceed to install the rest of the floor joists.
Step 6: Secure with Joist Hangers
To ensure that the floor joists are securely attached to the rim joists, use joist hangers. These metal brackets will provide additional support and help distribute the weight evenly across the floor structure. Attach the joist hangers to the rim joists and insert the floor joists into the hangers, securing them with nails or screws.
Step 7: Ensure Squareness
As you progress with the construction, it’s essential to ensure that the floor framing is square. Use a framing square or a measuring tape to check the angles and make any necessary adjustments. A well-aligned and square floor structure will ensure the stability and integrity of your mezzanine.
Step 8: Install the Floor Surface
Once the floor framing is complete and square, it’s time to install the floor surface. Use 3/4 inch plywood as the flooring material, cutting it to fit the dimensions of the mezzanine floor. Secure the plywood to the floor joists using nails or screws, ensuring a tight fit and a smooth surface for your mezzanine.
[How to build a mezzanine floor in shed] Conclusion
Building a mezzanine floor in your shed is a fantastic way to maximize the available space and create a functional work area or storage space. By following these step-by-step instructions and using expert tips, you can confidently undertake this construction project. Remember, safety should always be a top priority, so consider consulting a professional engineer to ensure your mezzanine floor is structurally sound and meets all safety standards. Now, get ready to transform your shed into a versatile space that suits your needs!
Do I need building regulations for a mezzanine floor? Click here to find out.
Want to know the ideal height for a house mezzanine floor? Discover more here.
Interested in learning how to build a wooden mezzanine floor? Check out our guide here.
Curious about the meaning of mezz floor? Find out more here.
Measuring and Planning The Layout of The Mezzanine Floor: A Comprehensive Guide
When it comes to maximizing space and storage in a building, a mezzanine floor can be a valuable addition. Mezzanine floors are intermediate floors that are built between the main floors of a building, effectively creating an additional level. Whether you are considering a mezzanine floor for a warehouse, shed, or commercial building, proper measuring and planning are crucial for a successful installation.
Measuring the Mezzanine Floor:
Before installing a mezzanine floor, accurate measurements are crucial to ensure a proper fit and weight capacity. Measuring the floor involves determining the desired size of the mezzanine floor and assessing the load-bearing capacity of the existing structure. The load capacity is measured in kilopascals (kPa) or kilonewtons per square meter. [Measuring and planning the layout of the mezzanine floor] is one of the most critical steps in the construction process.
Planning the Mezzanine Floor:
Effective planning is essential to ensure the layout, accessibility, and safety of the mezzanine floor. Consider the intended use of the space and design the layout accordingly. The floor should be easily accessible, either through stairs or a mezzanine floor lift. Safety features such as guardrails, handrails, and non-slip flooring should be incorporated into the design to prevent accidents.
Utilizing Mezzanine Floor Kits:
For a convenient and streamlined installation process, mezzanine floor kits can be utilized. These kits come with pre-engineered components and detailed instructions, making it easier for businesses to construct their own mezzanine floors. Mezzanine floor kits can save time and reduce costs compared to custom-designed installations.
Customization and Material Options:
Mezzanine floors can be customized to suit specific business needs. They can be designed to accommodate specific weight loads, heights, and configurations. Additionally, different materials can be used for mezzanine floor construction. Steel is a popular choice due to its strength and durability, while timber offers a more natural aesthetic. Each material has its own advantages in terms of cost, aesthetics, and maintenance requirements.
Key Takeaways:
– Mezzanine floors are an excellent way to increase storage space in a building.
– Adding a mezzanine floor is a cost-effective alternative to moving to a larger premises.
– Measuring and planning are essential for a successful installation.
– Mezzanine floors can be customized to suit specific business needs.
– Utilizing mezzanine floor kits can simplify the installation process.
– Different materials can be used for mezzanine floor construction, each with its own advantages.
In conclusion, accurate [measuring and planning the layout of the mezzanine floor] are crucial steps in the installation of a mezzanine floor. Mezzanine floor kits and customization options can simplify the installation process and allow businesses to maximize their storage space effectively. By following these guidelines, shed owners can transform their ordinary sheds into versatile workspaces or storage areas.
Assembling and Securing the Framework of the Mezzanine Floor
Building a mezzanine floor in your shed can greatly enhance its functionality and storage capacity. The key to a successful mezzanine floor construction lies in assembling and securing the framework properly. In this article, we will walk you through the steps of assembling and securing the framework of the mezzanine floor, ensuring a sturdy and reliable structure.
Step 1: Measure and Cut the Joist Boards
Start by measuring and cutting the rim joist and floor joist boards from 2×6 treated lumber. These boards will form the base of your mezzanine floor.
Step 2: Set the Rim Joists on the Shed Foundation
Place the rim joists on the shed foundation, ensuring they are aligned properly. These rim joists will provide support for the floor joists and ensure stability.
Step 3: Nail the Outer Floor Joists to the Rim Boards
Using nails, secure the outer floor joists to the rim boards, creating a secure frame for the mezzanine floor. Make sure the joists are evenly spaced and securely attached.
Step 4: Attach Joist Hangers to the Rim Joists
Install joist hangers onto the rim joists. These hangers will hold the floor joists in place and provide additional support.
Step 5: Install the Remaining Floor Joists
Proceed to install the remaining floor joists, evenly spacing them and securely attaching them to the rim joists. This will further strengthen the framework of the mezzanine floor.
Step 6: Ensure Squareness of the Floor Framing
Check the squareness of the floor framing by measuring diagonally from corner to corner. Adjust as needed to achieve a square shape, ensuring the stability and structural integrity of the mezzanine floor.
Step 7: Install the Plywood Flooring
To complete the framework, install a 3/4 inch plywood on top of the floor joists. This will create a smooth and durable surface for your mezzanine floor, ensuring it can withstand heavy loads.
By following these steps, you can assemble and secure the framework of your mezzanine floor in your shed. Remember to consult relevant sources and adhere to building regulations and safety requirements. With careful execution, you can create a functional and reliable space that maximizes your shed’s potential.
Key Takeaways:
- Assembling and securing the framework of a mezzanine floor is crucial for its stability and structural integrity.
- Measure and cut the joist boards accurately to create a solid base for the floor.
- Set the rim joists on the shed foundation and nail the outer floor joists to them for added support.
- Install joist hangers to hold the floor joists securely in place.
- Ensure even spacing and proper attachment of the remaining floor joists.
- Check the squareness of the floor framing to maintain stability.
- Complete the framework by installing plywood flooring for a durable surface.
Sources:
1. Plasticine House: How To Build a Shed Floor – Step-by-Step Guide
2. Shed Blog: Mezzanine Floors Expand Your Floorspace
Adding Flooring, Safety Features, and Finishing Touches to the Mezzanine Floor
Building a mezzanine floor in your shed is an excellent way to maximize space and create additional storage or work areas. Once you have completed the initial steps of measuring and planning, it’s time to focus on adding flooring, safety features, and finishing touches to ensure a functional and safe mezzanine floor.
Adding Flooring
The choice of flooring for your mezzanine floor depends on your specific needs and preferences. Consider factors such as durability, aesthetics, and ease of maintenance. Some common flooring options for mezzanine floors include:
-
Plywood: Using 3/4 inch plywood is a popular choice for its affordability and versatility. It provides a smooth surface and can withstand heavy loads.
-
Decking Boards: Decking boards made of timber or composite materials offer a natural or modern look. They are durable and can provide excellent traction.
-
Carpet or Vinyl: If you prefer a softer and more comfortable flooring option, carpet or vinyl can be a good choice. They can provide insulation and noise reduction.
-
Rubber Mats: Rubber mats are a practical choice if you need a floor that offers impact resistance and anti-slip properties. They are commonly used in workshops and gyms.
When installing the flooring, ensure that it is securely attached to the floor joists. Use screws or nails appropriate for the chosen flooring material, following the manufacturer’s instructions. Make sure the surface is level and smooth, with no protruding screws or uneven areas that may cause tripping hazards.
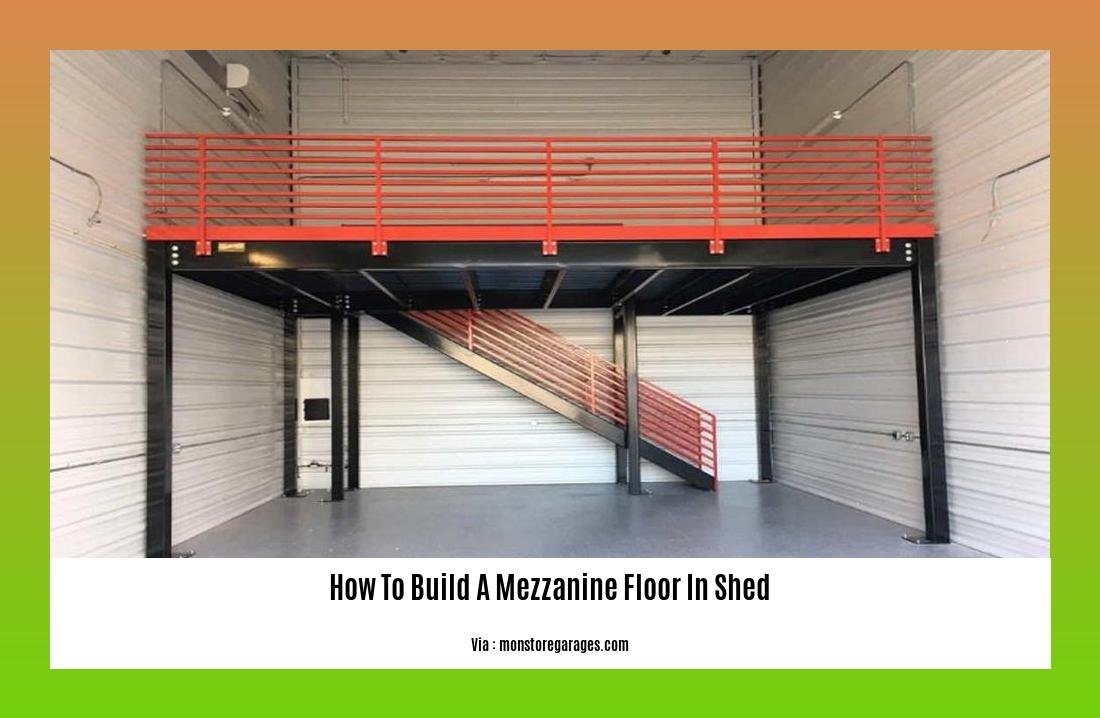
Safety Features
Safety should be a top priority when constructing a mezzanine floor. Incorporating safety features will help prevent accidents and ensure a secure environment. Here are some important safety aspects to consider:
-
Guardrails: Install guardrails around the perimeter of the mezzanine floor to prevent falls. The height of the guardrails should comply with local building codes and regulations. They should be sturdy and at a suitable height for both adults and children.
-
Handrails: Adding handrails along the stairs leading to the mezzanine floor provides additional support and stability. They should be secure and easy to grip.
-
Non-Slip Flooring: To reduce the risk of slips and falls, choose a flooring material with non-slip properties. Textured surfaces or adding non-slip coatings can provide better traction.
-
Proper Lighting: Ensure the mezzanine floor is well-lit to enhance visibility. Install adequate lighting fixtures, such as overhead lights or wall-mounted lamps, at strategic locations.
-
Fire Safety: Consider incorporating fire safety measures, such as fire extinguishers, smoke detectors, and clearly marked escape routes. Consult local fire safety regulations to ensure compliance.
Finishing Touches
Adding finishing touches to your mezzanine floor can enhance its functionality and aesthetics. Here are some ideas to consider:
-
Storage Solutions: Install shelves, cabinets, or hooks to maximize storage space. This will help keep the area organized and clutter-free.
-
Workstations: If you plan to use the mezzanine floor as a workspace, set up workstations with appropriate furniture and equipment. Consider ergonomic principles for comfort and productivity.
-
Accessories: Customize the space with accessories that reflect your personal style and improve the overall ambiance. This can include plants, artwork, or decorative lighting fixtures.
-
HVAC System: If desired, consider integrating heating, ventilation, and air conditioning (HVAC) systems into the mezzanine floor. This will ensure a comfortable temperature and airflow.
Taking the time to add flooring, safety features, and finishing touches to your mezzanine floor will result in a well-designed and practical space. Remember to adhere to building codes and regulations, and consult professionals if needed.
Key Takeaways:
- Choose the appropriate flooring material for your mezzanine floor, considering factors such as durability, aesthetics, and ease of maintenance.
- Prioritize safety by installing guardrails, handrails, non-slip flooring, and proper lighting.
- Consider fire safety measures and comply with local regulations.
- Add storage solutions, workstations, accessories, and HVAC systems to optimize functionality and personalization.
Citations:
1. The Constructor: Mezzanine Floor for Buildings: Important Features and Benefits
2. ESB: How to Build a Mezzanine Floor – Mezzanine Floors Made Easy
FAQ
Q1: What is a mezzanine floor and how can it benefit my shed?
A1: A mezzanine floor is an intermediate floor that is built between the main floors of a building, effectively creating an additional level. Adding a mezzanine floor to your shed can significantly increase your storage space or create a separate area for various purposes.
Q2: What are the important steps to consider when measuring and planning the layout of a mezzanine floor in a shed?
A2: When measuring and planning for a mezzanine floor in a shed, it is important to determine the overall size needed, mark out the location of posts, stairs, and overall footprint, and consider the clearance height required. Additionally, evaluating the load-bearing capacity of the shed’s existing structure and ensuring accessibility and safety features are included in the design are crucial steps.
Q3: Can I build a mezzanine floor in my shed on my own?
A3: Yes, it is possible to build a mezzanine floor in your shed on your own. However, it is recommended to have the mezzanine floor engineered to ensure it is fit for purpose and meets safety standards. Utilizing mezzanine floor kits can also simplify the installation process and provide detailed instructions for a successful DIY project.
Q4: What materials can be used to construct a mezzanine floor in a shed?
A4: Different materials can be used to construct a mezzanine floor in a shed. Steel, concrete, and wood are commonly used materials. Steel offers strength and durability, while concrete is suitable for heavy-duty applications. Wood provides a cost-effective and aesthetic option, especially for non-industrial settings.
Q5: Can a mezzanine floor be customized to suit my specific needs?
A5: Yes, mezzanine floors can be customized to suit specific needs. They can be designed to accommodate specific weight loads, heights, and configurations. Whether you require additional storage space or a separate area for an office or workspace, a mezzanine floor can be tailored to meet your specific requirements.

- Find Cheap Wall Sconces for Stylish, Budget-Friendly Home Lighting - June 19, 2026
- Led Ceiling Lights Fixtures Transform Home Lighting Options - June 18, 2026
- Long Lights Ceiling Fixtures Transform Spaces with Sleek Illumination - June 17, 2026