Want to maximize your space and boost its appeal with a mezzanine floor? This guide offers a step-by-step walkthrough, covering everything from initial planning to the final touches. Whether you’re an experienced DIY enthusiast or just starting out, we’ll guide you through assessing project feasibility, constructing it safely, and maintaining its pristine condition for years to come, turning unused space into a functional area. For more professional guidance, check out this mezzanine installation guide.
How to Build a Mezzanine Floor: A DIY Guide to Success
Dreaming of a mezzanine to expand your living space? Building one yourself is achievable with diligent planning and execution. While this guide emphasizes a do-it-yourself approach, it’s crucial to recognize that larger, more complex projects often benefit from professional assistance. The typical mezzanine floor installation cost can vary significantly, generally ranging from $5,000 to $30,000, depending on factors like size, materials, design complexity, and local labor rates.
Planning Your Dream Mezzanine: Precision is Key
Detailed planning is paramount before commencing any construction. Accurate measurements are crucial for a seamless fit and avoiding costly errors. Take the time to measure not only the floor dimensions but also the ceiling height, wall squareness, and any obstructions like pipes or electrical boxes. Create a detailed sketch or even a 3D model to visualize the structure within the space, ensuring a perfect fit and optimal functionality. Consider these elements during your planning phase:
- Intended Use: Define the primary purpose of the mezzanine. Will it serve as storage, a home office, a relaxation zone, or a combination? Understanding the intended use will dictate load-bearing requirements, space layout, and aesthetic considerations.
- Structural Requirements: Evaluate the load-bearing capacity needed based on the intended use. Storage areas require higher load ratings than relaxation zones. Consider the weight of furniture, equipment, and occupants. Factor in building codes, which specify minimum load requirements for different applications. Staircases and safety railings are also essential structural elements that must comply with local regulations.
- Aesthetic Preferences: Determine a style that complements your existing space and aligns with your personal taste. Consider the overall design aesthetic, including materials, finishes, and lighting. A simple, minimalist platform may be suitable for storage, while a more elaborate, integrated design may be desired for a home office or living area. Explore different design options and gather inspiration from magazines, websites, and home improvement stores.
Picking Your Materials: Balancing Strength, Sustainability, and Budget
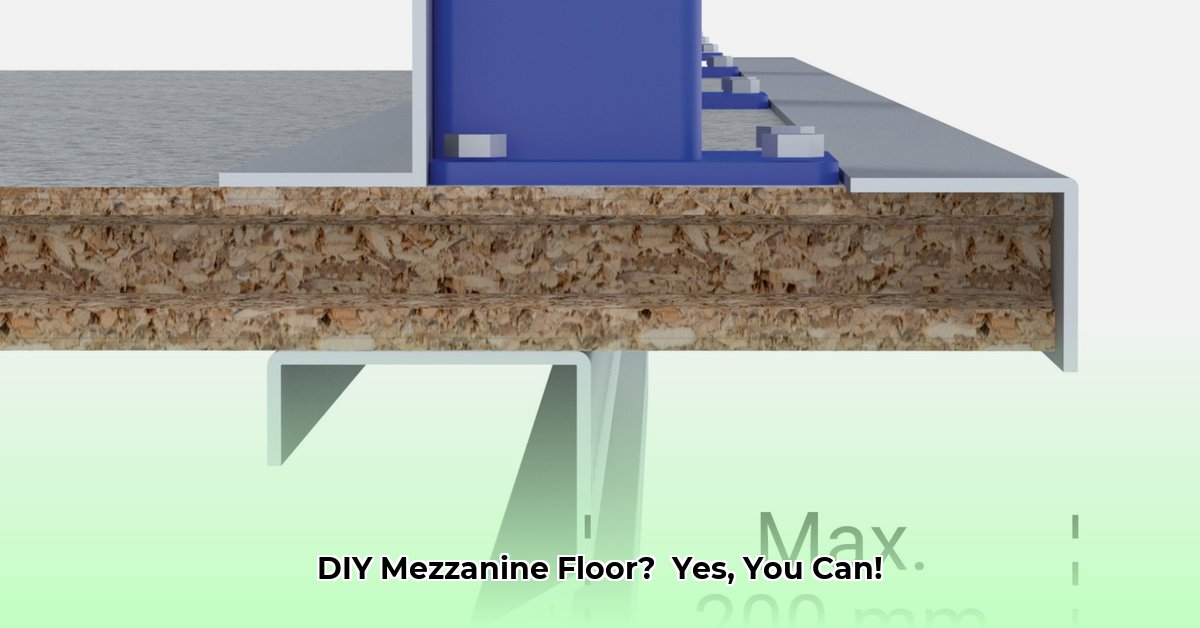
Selecting appropriate materials is essential for safety, durability, and aesthetics. Steel is often the preferred choice for support beams and framework, offering exceptional strength, dimensional stability, and ease of fabrication. Plywood or oriented strand board (OSB) are commonly used for subflooring, providing a stable base for the finished floor surface. Consider weight-bearing capacity, fire resistance, and moisture resistance when selecting materials.
Explore sustainable options such as reclaimed wood, bamboo flooring, or recycled steel to minimize environmental impact and potentially lower costs. Consider the overall aesthetic and select materials that complement the existing space. Factor in the cost of fasteners, connectors, and finishes when budgeting for materials.
Building Your Mezzanine: A Step-by-Step Guide
Now, let’s embark on the construction phase. Prioritize safety throughout the process. Wear appropriate personal protective equipment (PPE), including safety goggles, gloves, and sturdy work boots.
Step 1: Framing the Foundation – The Structural Core
Install the main support beams securely, ensuring proper alignment and leveling. Reference local building codes for proper anchoring techniques and spacing requirements. Securely fasten the support beams to the existing structure using appropriate connectors and fasteners to meet safety standards. Consult with a structural engineer if you have any concerns about the structural integrity of the existing building. Next, carefully install the joists, spacing them evenly to distribute the load across the floor surface. Attach the joists to the support beams using joist hangers or other approved connectors.
Step 2: Sheathing and Flooring – Creating a Solid Surface
Attach sheathing (plywood or OSB) tightly to the joists, ensuring proper alignment and secure fastening. Use construction adhesive in addition to fasteners to minimize movement and squeaking. Stagger the seams between sheathing panels to increase structural rigidity. Then, install your selected flooring material, ensuring each piece is properly aligned, secured, and finished. Consider factors such as durability, aesthetics, and ease of maintenance when selecting flooring.
Step 3: Stairs and Railings – Access and Safety
If required, meticulously construct stairs and railings, adhering to all applicable building codes for dimensions, heights, and handrail placement. Ensure that the stairs are properly supported and securely fastened to the mezzanine structure. Railings should be sturdy and provide adequate fall protection. Consider adding non-slip treads to the stairs for added safety.
Safety Precautions: Ensuring a Secure Environment
Safety is paramount throughout the construction process. Maintain a clean and organized workspace to minimize trip hazards. Wear safety glasses and a dust mask during cutting, drilling, or sanding operations. Always use the proper safety equipment when operating power tools. Familiarize yourself with the operating instructions and safety features of each tool before use. Regularly inspect connections and immediately address any issues to prevent accidents.
Navigating Regulations: Permits and Compliance
Consult local building codes and regulations before commencing construction. Obtain necessary permits to avoid fines, legal issues, and potential safety hazards. Familiarize yourself with regulations regarding load-bearing capacity, height restrictions, fire safety, accessibility, and egress to ensure compliance. Work with a qualified building inspector to ensure that your mezzanine meets all applicable codes and standards.
Budget Breakdown: DIY vs. Professional Installation
Estimate costs for materials, labor (if hiring professionals), permit fees, equipment rental, and unexpected expenses. DIY projects can save on labor costs but may require more time and effort. Engaging professionals can ensure structural integrity and code compliance, plus their insurance offers protection. Obtain multiple quotes from qualified contractors to compare pricing and services.
Troubleshooting and Long-Term Care: Maintaining Your Investment
Common issues include sagging floors (often due to incorrectly spaced joists or insufficient support) or loose fasteners. Regular inspections can prolong your mezzanine’s lifespan. Check for loose connections, signs of water damage, and any structural issues. Repair damage promptly and ensure good ventilation to prevent humidity-related problems. Apply a protective finish to the flooring to resist wear and tear.
Remember, success in mezzanine floor construction comes from careful planning, informed material choices, diligent safety practices, and adherence to building codes.
How to Compare DIY vs Professional Mezzanine Floor Installation Costs
Building a mezzanine floor is a significant undertaking, and how to compare DIY vs professional mezzanine floor installation costs is a crucial part of the decision-making process. Here’s a balanced look:
Key Takeaways:
- Efficiency: Professional installation typically minimizes disruption with faster project completion.
- Risk Management: DIY projects carry a higher risk of errors, potentially leading to considerable repair costs or safety hazards.
- Expertise: Professional installers provide specialized knowledge, skills, and experience, ensuring high-quality results and code compliance.
- Protection: Warranties offered for professionally installed projects can protect against installation defects, a benefit lacking in DIY efforts.
- Long-Term Savings: Although professional labor increases initial costs, potential long-term savings can stem from reduced repairs, improved durability, and increased property value, especially for complex projects.
- Subfloor Preparation: Often overlooked in DIY projects, proper subfloor preparation is critical for successful installation and long-term flooring performance.
The average cost range for a professionally installed mezzanine floor is estimated to be $8,000 to $30,000, but this can vary widely based on the aforementioned factors.
Assessing Your Skills and the Project’s Complexity
Accurately assess your abilities and experience before comparing costs. Are you comfortable working at heights and operating power tools? Do you possess a solid understanding of structural carpentry principles and local building codes? A simple, straightforward mezzanine design might be suitable for a skilled DIYer, but intricate designs involving complex framing, staircases, or advanced load calculations typically require professional expertise. The scope and complexity of the project, along with your skill level, significantly impacts how to compare DIY vs professional mezzanine floor installation costs. DIY projects undertaken without sufficient knowledge or experience may ultimately incur more expense than hiring a professional from the outset.
Breaking Down the Costs: DIY vs. Professional
Compare the detailed cost breakdown for each approach:
| Cost Category | DIY | Professional |
|---|---|---|
| Materials | Purchase cost of lumber, fasteners, flooring, connectors, safety equipment, etc. | Included in the professional’s quote (typically with a markup). |
| Labor | Your time (opportunity cost – what else could you be doing with that time?). | Hourly or project-based rate (includes wages, insurance, overhead, and profit). |
| Permits & Inspections | Costs associated with obtaining necessary permits, scheduling inspections, and addressing any code-related issues. | Typically handled by the professional (included in the quote). |
| Tools & Equipment | Rental or purchase costs for specialized tools (saws, drills, levels, scaffolding, safety gear, etc.). | Professional already owns specialized tools and equipment (included in overhead costs). |
| Mistakes & Rectifications | Potential costs for fixing errors, redoing work, purchasing additional materials due to mistakes, or addressing unexpected problems |

- Glass Tile Shower Ideas to Create a Stunning Bathroom Space - December 7, 2025
- Glass Wall Tile Ideas for Kitchens and Bathrooms - December 6, 2025
- Glass Tile Bathroom: Create a Beautiful, Easy-Clean Space - December 5, 2025