“`markdown
DIY Refrigerator Cabinet Surround: Upgrade Your Kitchen
Want to give your kitchen a magazine-worthy makeover? Building a custom cabinet surround for your refrigerator is a surprisingly easy and impactful DIY project. This comprehensive guide walks you through creating the refrigerator cabinet surround you’ve always dreamed of, whether you’re a seasoned DIYer or just starting out, so you can upgrade your kitchen space and maximize storage. For more inspiration, check out these amazing refrigerator cabinet designs.
Transform Your Kitchen with a Custom Refrigerator Cabinet Surround
Ready for a serious kitchen upgrade without a major renovation? Building a refrigerator cabinet surround is a fantastic DIY project that turns your fridge into a stylish design element, enhancing your home’s overall appeal and potentially increasing its value. It’s about more than just concealing your fridge; it’s about crafting a cohesive and aesthetically pleasing kitchen. Let’s dive in and explore how to achieve this transformation!
Precise Planning and Measurement Techniques for Your Refrigerator Enclosure
Careful planning is essential for a successful DIY project, specifically concerning the dimensions for your refrigerator cabinet. Accurate measurements are the cornerstone of a well-executed build. Use your measuring tape to determine the width, depth, and height of your refrigerator. The depth measurement should include the door swing.
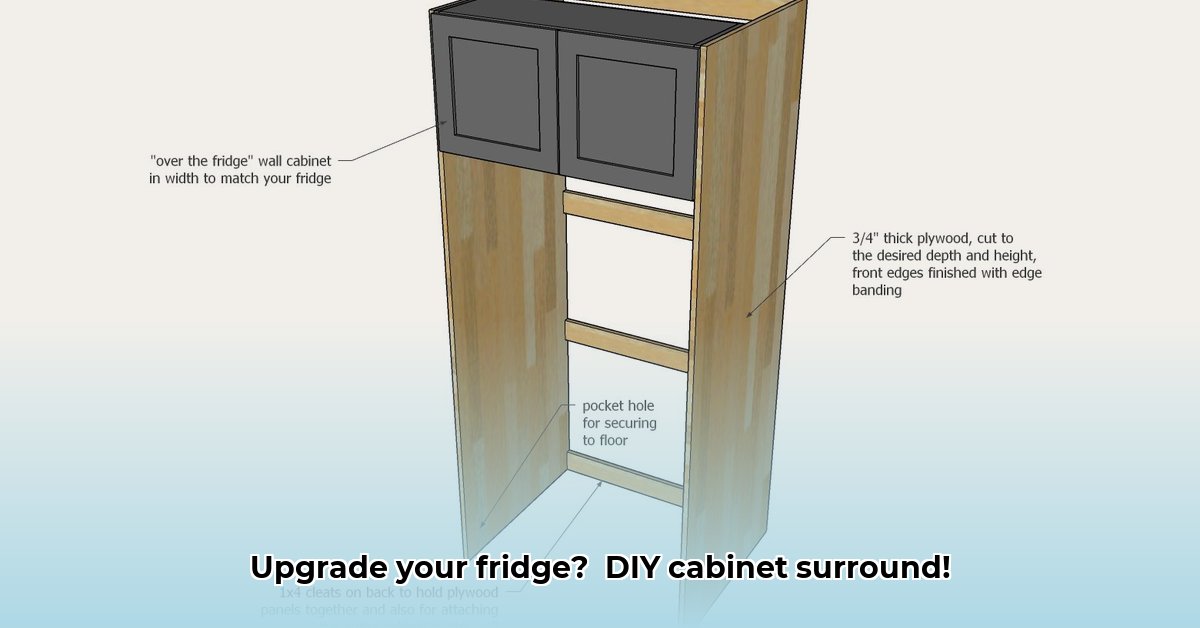
Add an extra inch or two on all sides to allow for future appliance upgrades. A cabinet roughly 78 inches tall and 37 inches wide should provide a flexible fit, regardless of your refrigerator’s brand.
Next, consider the depth. Counter-depth refrigerators (approximately 26-27 inches deep) achieve a seamless, built-in appearance, while standard-depth models (30-32 inches deep) offer greater affordability but protrude slightly. A cabinet should match your refrigerator’s depth.
When you’re choosing the right materials, birch plywood offers strength, moisture resistance, and visual appeal. MDF (medium-density fiberboard) is a more economical choice but more susceptible to moisture than plywood. According to the U.S. Department of Agriculture, kitchens have humidity levels between 50% and 70%.
Step-by-Step Guide to Building Your Custom Refrigerator Cabinet
Think of building this cabinet as assembling a custom-fit puzzle. You’ll follow these steps for a successful build:
- Cut the Pieces: Using your measurements and an accurate saw, cut the side panels, top piece, bottom piece, and shelves to size. Pre-drilling prevents wood splitting.
- Assemble the Frame: Use pocket hole screws to join the side panels with the top and bottom pieces. These hidden fasteners create strong, neat joints.
- Add the Shelves: Install sturdy shelves based on your preferred storage configuration. Space shelves to accommodate items you plan to store such as cookbooks or pantry staples.
- Attach the Back: Secure a back panel to the frame for increased stability and easy wall mounting.
- Prep for Painting: Before finishing, sand all surfaces smooth. Extra effort makes a difference in the final appearance.
Achieving a Flawless Finish on Your Refrigerator Cabinet Surround
You’ve completed the foundational structure. Now, it’s time to take it all the way to shine!
- Sanding and Priming: Sand the cabinet again to remove imperfections. Apply a quality wood primer to ensure smooth, even paint adhesion.
- Painting: Use a cabinet-specific paint for durability and easy cleaning. Select a complementary color to integrate your refrigerator within the kitchen’s design.
- Caulking: Caulk all seams and joints for a clean, professional finish that prevents moisture issues.
- Edge Banding: Cover plywood edges with edge banding for a polished aesthetic.
Installation and Final Touches for a Seamless Kitchen Upgrade
You’re nearing completion, one step from the final reveal!
- Wall Mounting: Securely attach the cabinet to the wall with appropriate anchors and screws, ensuring it’s level.
- Trim and Molding: Add trim or crown molding for a personalized, upscale look (optional).
- Refrigerator Trim Kits: Use pre-made trim kits for a seamless blend between the cabinet and the appliance (optional).
- Clean the Surround: Clean your built cabinet surround to ensure food-grade protection, while helping to seal in the paint.
Remember, this process is about creating a beautiful, functional space that reflects your personal style. A custom refrigerator cabinet surround elevates your kitchen’s style and utility.
Counter-Depth vs. Standard-Depth Refrigerator Cabinetry: How to Choose
The decision between counter-depth and standard-depth refrigerators impacts both aesthetics and functionality. A wrong decision can lead to space constraints, storage limitations, or an unappealing kitchen layout. This section will help you navigate the crucial factors when considering these options.
The most pivotal points to remember:
- Counter-depth refrigerators enhance aesthetics in smaller kitchens but reduce storage capacity.
- Standard-depth refrigerators offer more storage for larger families but may protrude.
- The best choice depends on your kitchen size, family needs, and aesthetic preferences.
Understanding the Dimensional Differences Between Refrigerators
Standard-depth refrigerators generally span 28 to 36 inches in depth, while counter-depth models are shallower, typically ranging from 24 to 30 inches. A smaller refrigerator depth means a smaller storage capacity.
Space Planning: Crucial for Refrigerator Selection
Before purchasing a refrigerator, accurate measurements are paramount. Sketch a plan of your kitchen, incorporating existing appliances and cabinetry, to see how your refrigerator will fit. Remember to consider door swings and the space required for opening.
The Role of Storage Capacity in Your Refrigerator Choice
Do you buy in bulk or just need the essentials? Larger households and bulk shoppers need the extra space offered by standard-depth models. Counter-depth models work for those prioritizing streamlined design with minimal storage requirements.
Balancing Aesthetics and Storage with Your Refrigerator
Counter-depth refrigerators offer a sleek, integrated look, blending seamlessly with countertops. While visually appealing, reduced capacity is a trade-off. Standard-depth models prioritize functionality and storage.
Workflow and Accessibility Considerations for Refrigerators
Consider your refrigerator’s placement and kitchen workflow. Deep refrigerators need more maneuvering space. Counter-depth units are closer to countertops and easier to access.
Budget and Installation Cost Considerations
Standard-depth refrigerators generally cost less than counter-depth models. Installation costs may vary based on the chosen model and integration complexity, particularly with custom cabinetry.
Making the Final Decision on Refrigerator Type
Factors such as family needs, kitchen layout, budget, and design preferences should weigh into your choice of how to choose between counter-depth and standard-depth refrigerator cabinetry.
Refrigerator Cabinet Surround Dimensions for Modern Kitchen Aesthetics
Creating custom refrigerator cabinet surrounds necessitates careful planning and an understanding of dimensional requirements for a seamless fit.
Consider this before building:
- Careful planning ensures a seamless fit.
- Oversized openings accommodate various models.
- Depth depends on the refrigerator type.
Initial Planning Steps for Your Refrigerator Cabinet
Using the manufacturer’s specifications, measure your refrigerator accurately. This precision guarantees a perfect fit when you plan your Refrigerator Cabinet Surround Dimensions for Modern Kitchens.
Design your cabinet for flexibility. A larger opening prevents expensive remodeling later. We recommend at least 78 inches high and 37 inches wide, regardless of the current refrigerator model.
Finding the Right Dimensions: Height, Width, and Depth
The ideal Refrigerator Cabinet Surround Dimensions for Modern Kitchens depend on three key measurements:
- Height: 78 inches accommodates most models.
- Width: 37 inches generally fits standard widths.
- Depth: Based on counter-depth or standard-depth refrigerator dimensions.
Key Considerations: Ventilation and Door Clearance
Ensure your refrigerator has plenty of breathing room because Insufficient ventilation leads to overheating and malfunctions. Also, plan for at least 12 inches of side clearance for unencumbered refrigerator access.
Simplified Construction Steps
This overview consolidates the construction process:
- Build the Frame: Construct a sturdy frame using the calculated dimensions.
- Integrate Venting: Incorporate ventilation strategically.
- Finish the Cabinet: Ensure seamless integration with kitchen cabinetry.
- Install the Refrigerator: Check ventilation and door clearance.
Conclusion: Elevate Your Kitchen By Building a Cabinet Surround
Building your refrigerator cabinet elevates the function and style of your kitchen.
Designing Refrigerator Cabinet Surrounds for Small Spaces
Building a refrigerator cabinet surround in small spaces can transform your kitchen, provided that you know the caveats.
Ensure you keep these things in mind:
- Measurements must be accurate for the small space.
- Plywood or MDF are good, cost-effective materials.
- Consider shallower depths for space conservation.
Initial Planning for Small Kitchens
In smaller kitchens, space optimization is key. Start by thoroughly measuring the available area, considering not only the floor space but also the vertical space.
Material Choices for Space-Constrained Kitchens
Select lightweight and durable materials. Plywood and MDF are cost-effective choices for the cabinet structure, but consider lighter alternatives for shelving to maximize space.
Maximizing Space with Depth Considerations
Opt for a counter-depth refrigerator to save precious inches. Design the cabinet surround to match this reduced depth.
Design Strategies for Refrigerator Cabinets in Small Kitchens
In small kitchens, every inch counts. Maximize space with these design tips:
- Vertical Storage: Extend the cabinet upwards to utilize vertical space for storing less frequently used items

- Glass Backsplash: Ideas For a Stylish Kitchen Update - December 2, 2025
- Glass On Tile: A Stylish Kitchen Backsplash Option - December 1, 2025
- Glass Tiles for Kitchen: Style and Durability Tips - November 30, 2025