Ready to elevate your home’s ambiance with the captivating glow of LED crown molding lighting? This comprehensive guide provides a step-by-step approach, empowering both beginners and seasoned DIYers to achieve professional-looking results. We’ll cover everything from planning and material selection to installation, troubleshooting, and even advanced techniques. Let’s illuminate your space with style!
Designing Your Luminous Crown
Before grabbing your tools, envision the final result. Consider the mood you want to create. A warm, inviting atmosphere likely calls for warmer color temperatures (2700K-3000K), while a modern, vibrant feel may benefit from cooler tones (5000K-6500K). Accurate measurements are crucial—measure the room’s perimeter to determine the required LED strip length. Factor in the crown molding’s profile; some shapes distribute light more effectively than others. Also, plan the power supply’s location—conceal it discreetly within a cabinet or behind furniture.
Gathering Your Supplies: The Essential Toolkit
Think of this as your DIY treasure hunt! Here’s what you’ll probably need:
- Crown Molding: Choose a material and style that complements your décor.
- LED Strip Lights: Select based on color temperature, brightness (lumens), density (LEDs/meter), and voltage. Flexible strips are ideal for curved moldings.
- Power Supply: Ensure compatibility with your LED strip’s voltage and wattage. A slightly higher wattage power supply can be beneficial for longevity.
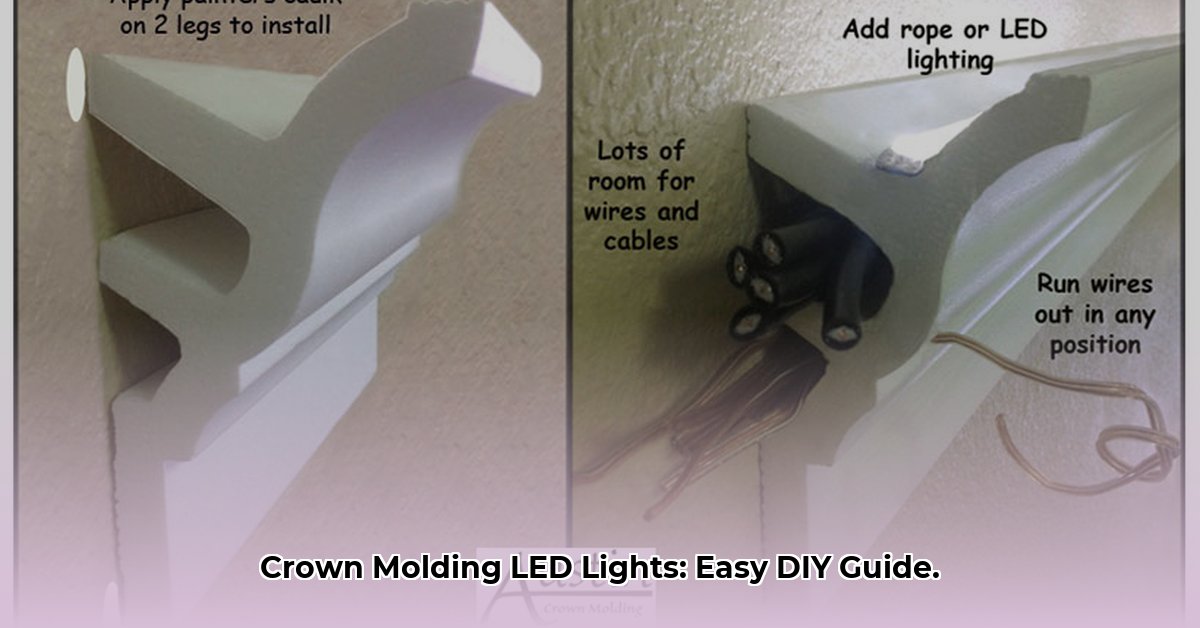
- Aluminum Channels (Recommended): These dissipate heat, extend LED lifespan, and provide a cleaner light line.
- Connectors: Used to join LED strips or extend wiring.
- Low-Voltage Wiring: Use the appropriate gauge for your power supply.
- Mounting Hardware: Screws, nails, or adhesive, depending on your setup.
- Dimmer (Optional): Allows for adjustable brightness and ambiance control.
- Tools: Measuring tape, saw (miter saw recommended), stud finder, level, drill, screwdriver, wire strippers, voltage tester, caulk gun, putty knife, safety glasses.
- Paint and Primer (Optional): For finishing the crown molding.
Step-by-Step Installation: Illuminating Your Space
- Prep the Crown Molding: Prime and paint the molding before installation for easier handling.
- Install the Nailer Board (Optional but Recommended): This creates a hidden mounting point for LED strips and wiring, especially helpful for uneven ceilings. Secure it to wall studs at the desired height.
- Mount the Crown Molding: Attach the molding to the nailer board or directly to the wall/ceiling, using appropriate fasteners. Coping inside corners creates a professional finish.
- Install LED Strips: Adhere the LED strips inside aluminum channels (if used) or directly to the nailer board/molding. Consider your desired lighting effect (uplighting, downlighting, indirect) when positioning the strips. Ensure even spacing for consistent illumination.
- Wire the System: Turn off power at the breaker box. Run low-voltage wiring from the power supply location to the LED strips, concealing it within the molding or behind the nailer board. Use connectors to join strips or extend wires as needed. If using a dimmer, incorporate it into the wiring now.
- Connect the Power Supply: With the breaker still off, connect the power supply to the house wiring, following the manufacturer’s instructions precisely. Double-check all connections with a voltage tester. If unsure about any electrical work, consult a qualified electrician.
- Test and Admire: Turn the breaker back on. Test your lights. Bask in the glow!
- Finishing Touches: Caulk any gaps, touch up paint, and conceal any visible wires.
Troubleshooting: Shining a Light on Potential Issues
- Flickering: Likely a loose connection. Check wiring, connectors, and the power supply.
- Uneven Brightness: Probably uneven LED strip spacing or a faulty strip section.
- Dim Light: The power supply may be insufficient for the LED strip length. Check wattage requirements.
- No Light: Verify power supply connection, breaker status, and wiring.
Design Inspiration: A Gallery of Glowing Ideas
- Indirect Lighting: Creates a soft, ambient glow, ideal for living rooms and bedrooms.
- Accent Lighting: Highlights architectural features or artwork.
- Color-Changing LEDs: Add dynamic flair and customize the ambiance for any occasion.
- Smart Home Integration: Control your lighting with voice commands or smartphone apps.
Advanced Techniques: Elevate Your Lighting Game
- Smart LED Strips: Integrate with smart home systems for voice control, scheduling, and dynamic scenes.
- Custom Lighting Profiles: Create unique lighting effects with diffusers or specialized channels.
- Dynamic Lighting: Synchronize lighting with music or movies for an immersive experience.
Maintenance and Care: Keeping Your Lights Brilliant
Dust occasionally to maintain optimal brightness. Address any flickering or dimming promptly. While LEDs have a long lifespan, ongoing research suggests that proper ventilation and heat management can further extend their longevity.
Product Recommendations: Your LED Lighting Toolkit (Coming Soon!)
A curated list of recommended LED strips, power supplies, dimmers, and accessories will be added soon. Stay tuned! When choosing products, prioritize reputable brands, check online reviews, and compare specifications carefully.
This guide provides a comprehensive foundation for your LED crown molding lighting project. Remember, ongoing advancements in LED technology mean new products and techniques are constantly emerging. Embrace the learning process, explore the possibilities, and enjoy transforming your space with the magic of light!

- Selecting Recessed Porch Lighting for Optimal Outdoor Ambiance and Safety - June 27, 2026
- Outdoor Recessed Lighting Ideas to Brighten Your Exterior Spaces - June 26, 2026
- Exterior Recessed Lighting Buyers Guide for Your Outdoor Space - June 25, 2026