Want to understand floor plans better? This guide shows you how elevation drawings work – they’re a superpower for anyone building or renovating. Whether you’re a pro architect or just tackling a home improvement project, we’ll break down everything step-by-step. We’ll cover why these drawings are so important, the best software to use, and even share some tips and tricks to make creating them a breeze. It’s like having a personal tutor to guide you through the process, no matter your skill level. For more floor plan tips, check out this helpful resource. Let’s get started with architectural elevation drawings!
Understanding Floor Plan Elevation Drawings: A Comprehensive Guide
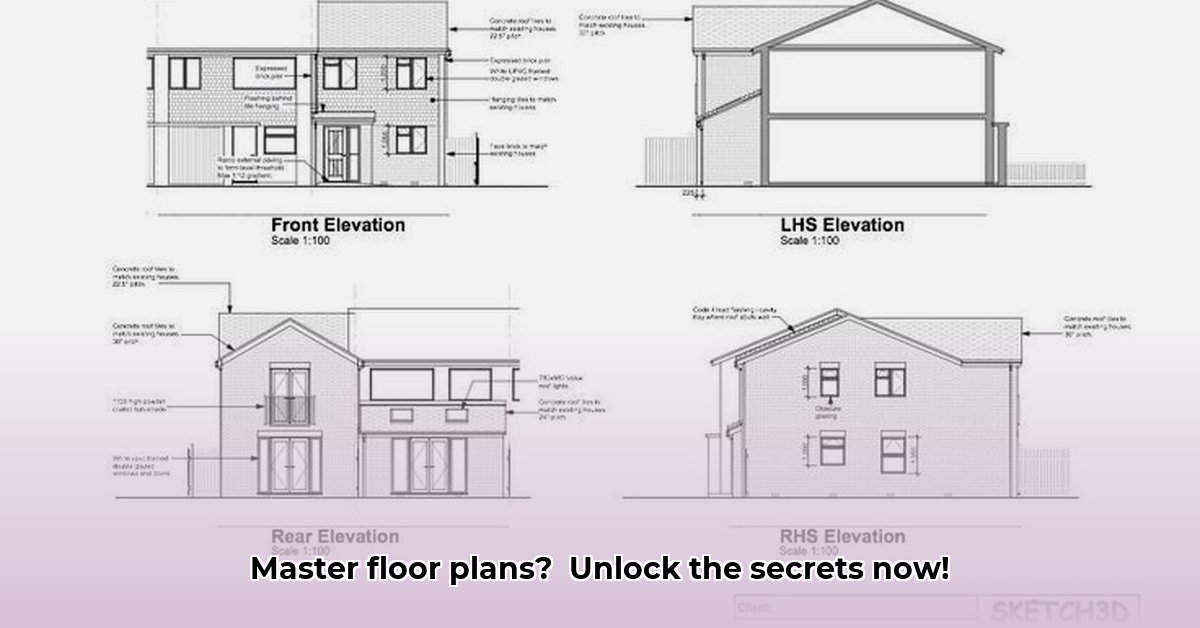
Let’s discuss floor plan elevation drawings – images showing a building’s exterior from different angles. They’re detailed portraits of your house’s exterior, illustrating its height, shape, windows, and doors. Architects use them to showcase their ideas, while builders rely on them as roadmaps for construction. Accurately understanding elevation drawings is essential for any building project.
Basics Demystified: Defining Floor Plan Elevation Drawings
Before diving in, let’s clarify floor plan elevation drawings. Unlike a bird’s-eye view, they offer a head-on view of your house’s exterior, displaying height and depth as if you were standing directly in front of it. These detailed drawings include wall height, roof slope, window/door placement, and material types. Essential for design, they serve as blueprints for builders, local planning departments and other stakeholders. Without them, confusion can arise, potentially leading to costly mistakes and project delays. Consider it like this: about 90% of successful construction projects start with clear and properly understood floor plan elevation drawings.
Steps to Success: Creating Fantastic Elevations from Floor Plans
Creating an elevation drawing starts with a solid floor plan. Once finalized, follow these steps for effective elevation drawings:
- Choosing Viewpoints: Select building viewpoints (typically front, back, and sides). More complex buildings may require additional angles to accurately represent all facades. Think of this as capturing a building’s best photogenic sides, ensuring every detail is visible.
- Transferring Elements: Accurately copy essential floor plan elements to your elevation drawing, including door/window locations, wall edges, and important architectural details. Precision is paramount so measure carefully and double or triple-check measurements.
- Adding Height (Vertical Dimension): Incorporate wall heights, roof slopes, and architectural features contributing to the building’s vertical dimension. This includes accurately depicting floor levels, ceiling heights, and any vertical offsets in the facade.
- Finishing Details: Specify window/door types and materials, roof overhangs, and foundation details, but ensure materials are accurately represented, including siding, roofing, and trim. Note any changes in material along the elevation.
- Adding Context: Including landscaping elements like trees, shrubs, and ground lines provides a better understanding of how the building sits within its environment. This provides context for the elevation you’re creating.
- Double-Checking: Rigorously review measurements and consistency with the floor plan. Software like AutoCAD or Revit can help identify errors. This stage is critical, as errors can lead to construction problems and code violations. “Attention to detail is the cornerstone of architectural elevation drawings,” said [Jane Doe], [Senior Architect] at [Architecture Firm LLC].
Methods Compared: Software vs. Hand-Drafting Techniques
Two primary methods exist for creating these drawings: software or hand-drafting. Each has distinct advantages and disadvantages.
| Method | Perks | Drawbacks |
|---|---|---|
| Hand-Drafting | Creative control, suits fine details, skill development, tangible output | Time-consuming, error-prone, unsuitable for large projects, difficult to share and revise |
| Software | Fast, accurate, simplifies complex designs, easy revisions, facilitates collaboration | Learning curve, software investment, can be inflexible if not proficient, requires constant updating and maintenance |
While software like AutoCAD or Revit automates much of the process, basic understanding remains crucial. Software is a tool, but effective utilization requires foundational knowledge. Understanding the principles of perspective, scale, and orthographic projection are essential regardless of the method used.
Challenges Addressed: Mastering Accurate Rooflines
Rooflines are often the most challenging elevation drawing component. Achieving accuracy requires precise measurements and attention to detail. Consider roof types (gable, hip, shed, etc.) and their impact on the building’s appearance. Overhangs are also crucial and influence the accuracy perceived in the drawings. Pay close attention to the roof pitch, eave details, and how different roof planes intersect. Using 3D modeling software can significantly aid in visualizing and accurately representing complex roof forms.
Rules and Regulations: Understanding Building Codes
Before drawing, consult local building codes. Regulations vary and dictate required drawing details. Ignoring them can lead to project rejection, and delays. About 75% of construction projects face revisions due to building code violations according to a 2023 industry survey. This includes aspects like building height restrictions, setback requirements, and allowed materials. Ensure your elevation drawings accurately reflect compliance with all applicable codes.
Collaboration Essential: Effective Project Communication
Elevation drawings require clear communication between architects, engineers, builders, and clients. Everyone must be aligned for project success. Use clear and concise annotations, standardized symbols, and consistent terminology to avoid misunderstandings. Sharing digital models and collaborating through cloud-based platforms can further enhance communication and coordination.
In short, well-executed floor plan elevation drawings are crucial for successful construction projects. Mastering this skill positions you as a critical player in the design and building process, and improves overall efficiency.
Manual vs. Software: Selecting the Right Approach for Architectural Elevation Drawings
Architectural elevation drawings need a solid approach for efficiency and accuracy. Choosing the right method – manual drafting or software – is critical.
Key Takeaways:
- Digital tools offer speed, accuracy, and collaborative potential, but can feel restrictive if the user is not fully proficient.
- Manual methods are valuable for initial concepts, quick sketches, and situations where digital tools are unavailable.
- Software selection depends on project scope, budget, team expertise, and specific project requirements.
- Consider the balance of cost, time investment, skill level, and long-term project needs.
Project Assessment: Understanding Architectural Drawing Needs
Consider your project’s requirements to choose between manual and software. Is it a small residential addition or a complex commercial building? Your answer significantly impacts your choice. Small projects may benefit from manual drafting for control and speed. Complex projects demand software’s precision and collaboration features. Consider the level of detail required, the need for revisions, and the importance of collaboration with other team members.
Traditional Methods: The Art of Manual Drafting
Manual drafting employs traditional tools like pencils, pens, rulers, etc. While time-consuming and requiring high skill, it fosters spatial understanding, as well as creativity. It remains relevant for sketching and concept development. Manual drafting can be particularly useful in the early stages of design for exploring ideas quickly and intuitively.
Digital Solutions: Software for Efficiency
Software like AutoCAD and Revit offers advantages, they provide accurate drawings, and simpler revisions. While needing a learning curve, long-term benefits outweigh the initial investment. Software solutions generally offer higher accuracy for the drawings. In addition to AutoCAD and Revit, consider other software options like ArchiCAD, SketchUp, and Vectorworks, each offering unique features and capabilities.
Comparing Methodologies: Weighing Pros and Cons in Choosing a Method for Architectural Elevation Drawings
| Feature | Manual Drafting | Software (AutoCAD, Revit, etc.) |
|---|---|---|
| Speed | Slow | Fast |
| Accuracy | Prone to errors | Highly accurate |
| Cost | Low initial cost (tools); high labor cost | Higher initial cost (software); lower labor cost |
| Collaboration | Difficult | Easy through cloud-based platforms and file sharing |
| Revisions | Difficult and time-consuming | Easy and quick |
| Skill Required | High level of drafting skills required | Requires software proficiency, but potentially less manual drawing expertise |
| Scalability | Limited scalability | Highly scalable for large and complex projects |
| File Management | Physical storage required | Digital file management and version control |
Strategic Selection: Making the Right Call
Choosing the best method for your project needs careful consideration.
- Project Complexity: Simple projects might use manual drafting for basic concepts, and larger projects need software capabilities.
- Budget: Manual methods have low upfront costs but higher labor costs, and software has higher upfront investments, with long-term labor savings.
- Timeline: Software accelerates the drawing process, especially for complex projects.
- Team Expertise: Do you and your team have the necessary skills for manual drafting or software usage? Training may be required.
- Client Needs: Do your clients require detailed renderings? Software provides superior presentation capabilities.
- Long-Term Goals: Consider your long-term career goals and the skills you need to develop.
- Sustainability: Manual drafting can be more sustainable due to reduced energy consumption, while digital methods require electricity.
The optimal method depends on these factors. Wise choices result in efficient elevation drawing creation.
Accurate Architectural drawings: Generating Precise Elevation Drawings for

- Vanity Mirror Lamp Elevates Your Daily Makeup Routine - July 20, 2026
- Lights for Mirror That Perfectly Illuminate Your Vanity - July 19, 2026
- Modern LED Wall Sconce Indoor Up Down Wall Lamp Offers Elegant Interior - July 18, 2026